|
DACT
|
|
|
|
|
|
|
|
|
Attenuation Curve Calculator Manual
|
|
|
|
|
|
The DACT Attenuation Curve Calculator (ACC) is a tool to assist DACT customers and others interested in designing their attenuator / volume control circuit correctly. The ACC is especially useful for calculating passive volume controls (passive preamps).The Attenuation Curve Calculator is a Microsoft Excel spreadsheet (version 5.0 or later). It requires only input of three figures to run a complete set of curves.
What does the Attenuation Curve Calculator do?
The ACC calculates real-life frequency response curves based on the actual components connected to the attenuator. The ACC shows not only one frequency response curve, but one frequency response curve for each attenuator position (totally 24 steps). So it becomes easy to see worst- and best-case situations.
|
|
|
|

Fig. 1. The results presented by the Attenuation Curve Calculator
|
|
|
|
To the top 
|
|
|
|
Fig. 2. Attenuator including load |
The Attenuation Curve Calculator shows curves for the transfer function Vout/Vin in Fig. 2, as a function of frequency. In other words, the curves show the output signal from the attenuator at varying frequency. This equals the input signal for the unit following the attenuator, which is normally a preamplifier stage, possibly built into the power amplifier (passive volume control).
The Attenuation Curve Calculator uses the circuit of Fig. 2 to calculate the frequency response curves. Please observe that the ACC assumes that the output impedance of the equipment feeding the attenuator is zero (or at least much lower than the attenuator resistance).
Rinput, which is one of the 3 input values to the calculator, is the total resistance loading the attenuator. Rinput is normally the input resistance of the amplifier stage following the attenuator, for instance the input resistance of the power amplifier.
The loading capacitance consists of two external components as shown in Fig. 2. The capacitance loading the attenuator is the sum of the cable capacitance Ccable and the input capacitance of the following stage, called Cinput. Actually there is another small capacitance, which is part of the attenuator itself. That additional load capacitance is only 2pF. The effect of the 2pF internal capacitance is built into the ACC so the user does not need to be concerned about it. Usually, the loading capacitance is dominated by the cable capacitance. |
|
|
|
To the top
|
|
|
|
Fig. 3. Complete picture of the Attenuation Curve Calculator screen
|
|
|
|
|
|
To the top
|
|
How to use the DACT Attenuation Curve Calculator
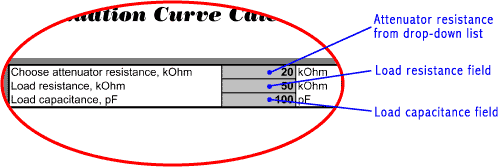
First enter the input data that the ACC requires. The first is the attenuator resistance. A click in the attenuator resistance value field will make an arrow show up in the right side of the field. Click the arrow and choose a resistance value from the drop-down list. The available values are all available resistances of DACT standard stepped attenuators: 10, 20, 50, 100, 250 and 500kOhm.
Then input the load resistance in the next field. The value entered here should be the resistive part of the load on the attenuator output, in kOhm. If the attenuator for instance is loaded with a power amplifier (passive preamp application) with an input resistance of 100kOhm, the entered value should be 100. If the attenuator is used as a volume control in an active preamplifier, the entered value should be the input resistance of the amplifier stage that follows the attenuator. If the load resistance is not known, it can be measured. However, make sure to perform a correct measurement. Some times, the resistance measured with a simple ohmmeter is not correct. Besides, using an ohmmeter may in some cases cause damage to the equipment it is connected to. The damage may be caused by the power source (often a battery) that is built into the ohmmeter.
At last, enter the load capacitance in the third field. The value to enter here is the sum of the connected capacitances. Usually it is the capacitance of the cables on the attenuator output plus the input capacitance of the connected amplifier or amplifier stage. Cload = Ccable + Cinput.
|
|
|
|
|
|
Fig. 4. The three input fields for the Attenuation Curve Calculator
|
|
|
|
|
|
The cable capacitance is usually the dominating (largest) capacitance. Some cable manufacturers specify how large their cable capacitance is. Either as a fixed value (for instance 100pF) or as capacitance per length unit (for instance 100pF/m or 100pF/ft). In case the cable capacitance is specified per meter or per foot, the cable capacitance is calculated by multiplying the capacitance per meter (or per foot) by the cable length in meters (or feet).
The load capacitance must be entered in pF (pico Farad). So make sure to convert to pF before entering the value. 1 nF (nano Farad) = 1,000 pF. 1uF (micro Farad) = 1,000,000 pF.
If the load capacitance is not known, it can be measured. However, make sure to perform a correct measurement. Some times, the capacitance measured with a simple capacitance meter is not correct. Besides, using a capacitance meter may in some cases cause damage to the equipment it is connected to. The damage may be caused by the power source that is built into the capacitance meter.
Contacting your cable and amplifier manufacturers may some times be the easiest way to obtain accurate load impedance information.
|
|
|
|
|
|
|
|
Interpreting the results
The Attenuation Curve Calculator shows the magnitude of the attenuation as a function of frequency for each of the 24 attenuator steps.
The main effect of the load resistance is that the attenuation values for all steps are altered compared to the non-loaded situation. If there is no load on the attenuator output, the 24 output levels are: 0dB, -2dB, -4dB, -6dB, -8dB, -10dB, -12dB, -14dB, -16dB, -18dB, -20dB, -22dB, -24dB, -26dB, -28dB, -30dB, -32dB, -34dB, -38dB, -42dB, -46dB, -50dB, -60dB. The Attenuation Curve Calculator can simulate this situation if a very high load resistance value is entered. Try for instance 99999999.
As the load resistance is reduced, the attenuation step values start changing. Try for instance to enter same load resistance as the attenuator resistance, and see what happens to the attenuation step values.
The load capacitance determines the upper frequency limit of the combination of the attenuator and the load. If 0 load capacitance is entered, the curves will show the highest possible cut-off frequencies, because then the capacitance of the attenuator itself (around 2pF) is the only limitation of the bandwidth.
Choosing different attenuator resistance values makes it clear, that the higher resistance values are more sensitive to load capacitance. That is also the reason why DACT always recommends using 10kOhm attenuators for passive preamp applications.
|
|
|
|
To the top
|
|
|
|
|
|
|
|
|
|
|
|
|
|
")